
Accessing Web Servers on Windows 10
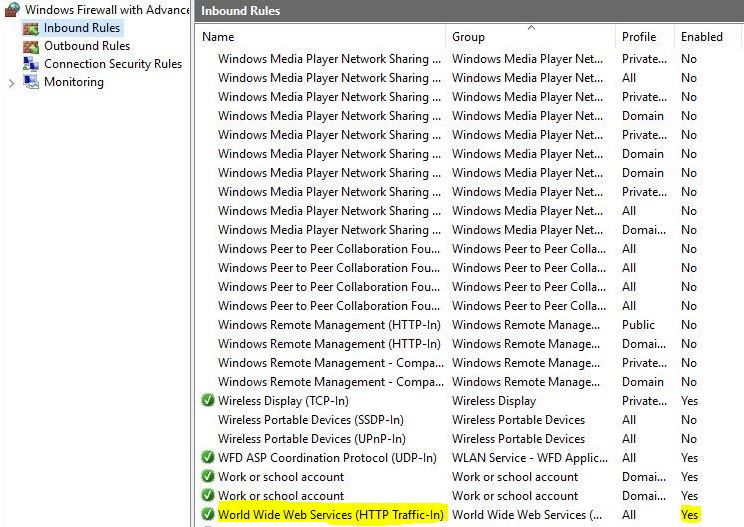
If you'd like to test your web server over a network, you may need to change your Windows Firewall settings. For security reason, Windows Firewall does not allow remote access to a web server on your local computer by default. To change this, open the Windows Firewall utility in the Windows Control Panel. Click the Advanced settings, then click Inbound Rules and ensure that World Wide Web Services is enabled.
Microsoft Internet Information Services (IIS) on Windows 10
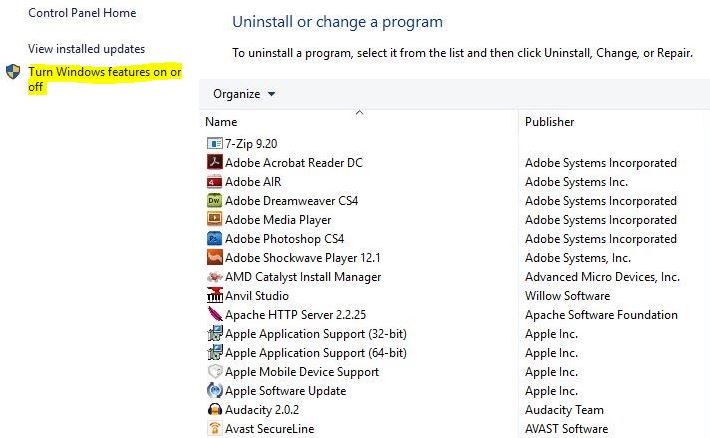
To install IIS on Windows 10, open the Programs and Features, then select Turn Windows Features On or Off.
Check the checkbox next to Internet Information Services. Expand the World Wide Web Services and Application Development Features by clicking the small plus sign to its left. Then check the checkbox next to CGI and clik OK.

After installing IIS, make sure that you stop any existing web servers on your computer such as Apache. IIS needs port 80 to be available for using phpMyAdmin to administer MySQL.
Start the Internet services manager by right clicking the Start button and opening the Control Panel. Then double click the Administrative Tools icon and double click the Internet Services Manager icon. Alternatively, you can type inetmgr at Search the web and Windows to open this window. You place documents that will be requested from IIS either in the website's default directory (i.e., C:\Inetpub\wwwroot) or in a virtual directory. A virtual directory is an alias for an existing directory that resides on the local machine (e.g., C:\) or on the network. When a server is accessed from a web browser, content in the default directory and virtual directories is visible to the client.
In the window, the left pane contains the web server's directory structure. The name of the machine running IIS is listed under Internet Information Services. Clicking the + symbol to the left of the machine name displays Default Web Site (and possibly several other nodes). To start IIS so it can serve content, right click Default Web Site and select Start.

To request the document from IIS or Apache, start the server, launch a web browser and enter the XHTML document's URL (i.e., http://localhost/test.html) in the Address field and it will display the result of requesting html in Internet Explorer 11.

If you want to change localhost to a domain name, locate your hosts file. In Windows 10, this file is located in This PC:\Windows(C:)\Windows\System32\drivers\etc

Open this hosts file with a Notepad. Right click on Notepad and select Run as administrator. Click File and Open. Navigate through the hosts file location and open it. Select All Files and you should see the hosts file.

Add lines containing the domain names(s) and IP address to redirect to.

Launch a web browser and enter your domain name and XHTML document's URL in the Address field and it will display the result of requesting html page in Internet Explorer 11.


To create a virtual directory, right click Default Web Site and select Add Virtual Directory...This displays the Add Virtual Directory dialog. In the Alias: field, enter a name for the virtual directory. I use the name Chapter21Test, although the virtual directory may have any name, provided that it does not conflict with an existing virtual directory. In the Physical path: field, enter the path for the directory containing the documents that clients will view. I created a directory named C:\Chapter21Examples for my documents. If necessary, select the ... button to navigate to the desired directory or to create a new one. Click OK to create the new virtual directory.

Launch a web browser and enter your domain name and XHTML document's URL in the Address field and it will display the result of requesting html page in Internet Explorer 11.

You can add a port number in Site Bindings.


Apache HTTP Server
Apache is currently the most popular web server because of its stability, efficiency, portability, security and small size. It is open source software that runs on UNIX, Mac, Windows and numerous other platforms. I currently used Apache 2.2.25. Make sure that you download the installer version because it is much easier to install. Click here for a free download of this version.
After installing the Apache HTTP Server, make sure that you stop any existing web servers on your computer such as IIS. Apache needs port 80 to be available for using phpMyAdmin to administer MySQL. Start the application. Open the Start menu, select All Apps > Apache HTTP Server > Monitor Apache Servers. Double click on the Apache Service Monitor that appears in your Taskbar, select Apache2, and click Start.
All documents that will be requested from an Apache HTTP Server must either be in the default directory (i.e,C:\Program Files (x86)\Apache Software Foundation\Apache2.2\htdocs.

Launch a web browser and enter your domain name and XHTML document's URL in the Address field and it will display the result of requesting html page in Internet Explorer 11.

An alias is Apache's equivalent to Microsoft IIS's virtual directory. It is a pointer to an existing directory that resides on the local machine or on the network. Instead of using an administrative utility or set of wizards, I configure the Apache HTTP Server by editing the httpd.conf file. This file contains all the information that Apache HTTP Server needs to run correctly and serve web documents. For Windows, the httpd.conf file is located in the conf subdirectory of Apache's installation directory. to edit this file, either open the httpd.conf in the text editor, or in Windows go to the Start menu and select Programs > Apache HTTP Server [version number] > Configure Apache Server > Edit the Apache httpd.conf Configuration File. httpd.conf is a large text file containing all of Apache HTTP Server's configuration information. In this file, any line that start with a # is a comment that explains the various configuration options.
An introductory comment at the top of the httpd.conf file explains how the file is organized. After this comment, the configuration information starts with the most important, global settings. These should have been configured correctly by the Apache installer. Scroll down in the file until you have reached the section titled DocumentRoot (using your text editor's search function will save time). The DocumentRoot setting specifies Apache's default directory. In Windows, the default setting is:
DocumentRoot "C:/Program Files/Apache Software Foundation/Apache2.2.25/htdocs"
Now, find the section starting with
# This alias is for the example
Alias /Chapter21Test "C:/Chapter21Examples"
This creates an alias called Chapter21Test that points to the physical directory C:\Chapter21Examples. I use the name Chapter21Test, but any name that does not conflict with an existing alias is allowed. I created a directory named C:\Chapter21Examples that contains my documents. Note that in both the name of the alias and the path of the directory to which the alias points we must use forward slashes (/), not backslashes (\).
Once I have created the alias, I must set the access settings of that directory so that users have permission to access it. The default access settings for every directory are to deny access to everybody. In order to override those settings for my new directory, C:\Chapter21Examples, I must create a new Directory entry. I append this new Directory entry to the end of the file:
# Begin Chapter21Examples directory access settings
<Directory "C:/Chapter21Examples">
Options Indexed
Order allow,deny
Allow from all
</Directory>
Indexes on the Options line specifies that if an index file, such as index.html, does not exist, Apache will generate one for you that contains the filenames of every document in the directory. Order allow,deny specifies that users are permitted access by default, and are denied only if they specifically blocked. Allow from all specifies that all users are permitted access.
Now, the Apache HTTP Server is configured to serve my web document from the C:\Chapter21Examples directory. I need to restart the server so that my changes to httpd.conf file will take effect. Then I will be ready to request documents from the Apache HTTP Server. To restart the server, I must first stop it and start it again.
MySQL
MySQL is a multiuser, multithreaded server that uses SQL to interact with and manipulate data. We can embed in an application. It is supported for many programming languages. I currently used MySQL 5.7.11. Make sure that you download the installer version because it is much easier to install. Click here for a free download of this version.
After installing MySQL, open the Start menu, select All Apps > MySQL. You can execute scripts in the MySQL command-line client tool. Open MySQL 5.7 Command Line Client and type your password.

Execute the script by typing directories to the location that contains the sql script.

This creates a books database in the server's data directory.

PHP
PHP is Hypertext Preprocessor. It has become one of the most popular server-side scripting languages for creating dynamic web pages. It is platform independent-implementations exist for all major operating systems. It also supports many databases, including MySQL. I currently used PHP 5.3.29. Make sure that you download the installer version because it is much easier to install. If you want to install PHP on IIS, then you need to download non-thread-safe or nts version. If you want to install PHP on Apache, then you need to download other version. Click here for a free download of this version.
During setup, be sure to check the right server you want to use. If you install on IIS, then you need to select IIS FastCGI.

If you install on Apache, then you need to select Apache 2.2.x Module

When the "Choose Items to Install" window is displayed, expand the Extensions menu by clicking the small plus sign to its left.

Then click the down arrow to the left of the MySQL option, and select the "Will be installed on local hard drive" option. This will ensure that your PHP script will be able to access your MySQL database server.

Launch a web browser and enter your PHP document's URL in the Address field and it will display the result of requesting PHP page in Internet Explorer 11.

phpMyAdmin
phpMyAdmin is a free and open source tool written in PHP intended to handle the administration of MySQL 5.7 with the use of a web browser. It can perform various tasks such as creating, modifying or deleting databases, tables, fields or rows; executing SQL statements; or managing users and permissions. I currently used phpMyAdmin 4.4.15.1 because it is compatible with MySQL 5.7 and PHP 5.3.29. Click here for a free download of this version.
Extract and place phpMyAdmin into localhost's DocumentRoot folder. Then rename the folder "phpMyAdmin*4*x.x.x-language" as "phpmyadmin".

Launch a web browser and enter your phpmyadmin's URL in the Address field and it will display the result of requesting phpMyAdmin's log in page in Internet Explorer 11.

Type your user name and password to log in. You should be able to see your books database that you have created earlier.

config.inc and web.config
If your web application has config.inc and web.config, make sure that you have the correct setting for site, database, and mail in the config.inc file.
$config['siteURL'] = "http://localhost/folder or alias/";
$config['serverLocation'] = "C:/inetpub/wwwroot/folder/ or C:/folder/";
$config['SQL'][1]['username'] = "root or username";
$config['SQL'][1]['password'] = "password";
$config['SQL'][1]['database'] = "databasename";
$config['mail'][1]['IMAPServer'] = "server name";
$config['mail'][1]['IMAPPort'] = "993";
$config['mail'][1]['IMAPSSL'] = "ON";
$config['mail'][1]['SMTPServer'] = "server name";
$config['mail'][1]['SMTPPort'] = "465";
$config['mail'][1]['SMTPSSL'] = "ON";
Also in the web.config file, you might need to comment out these two lines.
<!--
<mimeMap fileExtension=".woff" mimeType="application/x-font-woff" />
<mimeMap fileExtension=".otf" mimeType="font/opentype" />
-->
Final Project for Database Technology
This project is used PHP 5.2.3. It is no longer compatible with the most recent version of PHP.
This database diagram is the conceptual model using an ERD with crow's foot notation.
Database Design
The database consists of seven tables. Many have a column that maintains unique ID numbers,
and other have two columns that maintain one table‘s ID number and the corresponding another table‘s ID number. The columns represent the relationship between one table and another table. One row in one table may be associated with many rows in another table, and vice versa.
sql scripts
There are some constraints for each of these tables. For example, the ClientID column in the ClientBusiness table is a foreign key that helps maintain the Rule of Referential Integrity which is every foreign key value must appear as another table‘s primary key value. Notice that there is also “on delete cascade” clause in the end of these statements. This will drop any foreign key constraint that references it when you drop a row from a table.
- Request.sql: script of database (Note that data in this script are not actual data. They are used for test purpose only.)
- request query.sql: script of SQL commands
Web pages
On the home page, I create a link to a Request Form which provides us information about the clients. I use this form to collect data from the users. Data that users enter on a web page is sent to a web server. I use PHP to build it into one dynamic document. I add error checking to each of the text input fields and inform the user of invalid entries on the form itself. After the form has been successfully completed, I store the input from the user in a MySQL database.
There is a separate web page that posts form consisting of a selected database column to the server and processes the form data.
There is a drop down menu that displays more queries. For instant, a query displays the entire database; a query updates contact info; a query deletes a row in MySQL database.
Scripts
- data.html: form posting and options of queries displaying webpage
- business.php, client.php, link.php, project.php: processing the form data
- createPhone.php: creating a phone table
- delete.php: deleting a row
- dynamicForm3.php: form collecting data from the users
- formDatabase3.php: displaying the contents of the database
- howManyProjects.php: listing the number of projects for one client
- likeFirstName.php: listing the client that have this first name
- login.php: displaying user and login
- moreProject.php: listing clients that have more than a number of projects
- numberOfProjects.php: listing the number of projects for each client
- orderByName.php: listing the complete database order by name
- searchByName.php: searching by name
- searchByProject.php: searching by project
- updateContactInfo.php: updating the client's contact info